
Blooming
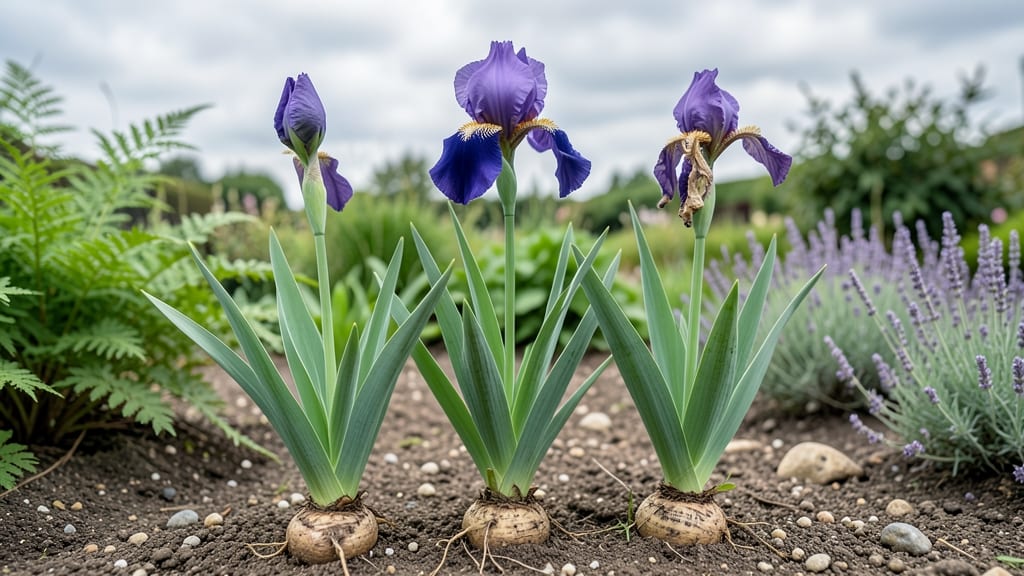
Watch your irises transform from tight buds to showstopping blooms—each stage reveals what they truly need. 🌸 The journey starts with that first plump green spike in spring, when proper watering and sunlight set the stage for everything that follows.
I’ve learned the hard way that skipping this phase means weaker blooms later, but getting it right guarantees bold, vibrant flowers that last for weeks.
Bud formation is where the magic begins, but it’s also the most delicate phase. Irises need consistent moisture—not soggy soil, just enough to keep those buds firm. Too much water here, and you risk rot; too little, and the blooms may never open.
I’ve seen tight buds split open into velvety petals just by adjusting my watering schedule from once a week to every other day.
Full bloom is the payoff: jewel-toned petals unfurling in layers, each variety revealing its unique character. This is when you’ll notice the distinct fall of bearded irises or the ruffled edges of Siberians—details that make the whole garden sing.
Prune spent blooms immediately to redirect energy to next year’s growth, and watch how the foliage stays lush and green instead of drying out.
Post-bloom care is where most gardeners trip up, but it’s the secret to long-term iris health. Let the leaves die back naturally—they’re feeding the rhizomes for next season’s blooms.
A light high-phosphorus fertilizer in early fall gives them a head start, and you’ll thank yourself when those buds appear earlier and stronger the following spring.
📚 In This Guide
- What you need
- Instructions
- Tips and common mistakes
- Wrapping up and next steps
What you need
- ● Iris plants: 3–5 varieties (e.g., Iris germanica, Iris sibirica, or Iris pseudacorus) for comparison. Choose healthy, mature bulbs or rhizomes.
- ● Notebook/journal: 1 (for recording bloom stages, dates, and observations). Use a waterproof or outdoor-friendly option if documenting in gardens.
- ● Camera or smartphone: 1 with a macro setting (for close-up shots of petal details). A tripod or stabilizer helps for consistency.
- ● Measuring tape/ruler: 1 (to track petal length and bloom diameter). A clear ruler works best for precision.
- ● Permanent markers or labels: 5–10 (to tag plants by variety and stage). Use weather-resistant labels for outdoor setups.
- ○ Magnifying glass (optional): 1 (5x–10x magnification) to inspect fine details like stamens or fall color changes.
- ○ Color chart or app (optional): 1 (e.g., Pantone Guide or ColorSnap) to document exact hue shifts during blooming.
- ○ Weatherproof bag or box (optional): 1 (to preserve cut blooms for later analysis if needed).
- ● Knowledge of iris varieties: Familiarize yourself with 2–3 iris types to compare growth patterns. Online databases (e.g., American Iris Society) are great resources!
- ● Growing conditions: Ensure your iris plants receive 6+ hours of sunlight daily and well-draining soil (pH 6.0–7.0). Amend soil with compost if needed.
- ● Patience: Iris blooms can take 3–6 weeks to progress through all stages—plan your observations accordingly!
How to identify iris bloom stages by petal development
Recognizing iris bloom stages helps you predict peak flowering and plan for optimal care.
🌱 Step 1: Observe the Bud Formation Stage
Iris blooms begin as tight, oval-shaped buds that form along the rhizome's leafless stalk. These buds swell gradually over 2-3 weeks before opening. Look for a slight green tint at the base—this indicates active growth. In Siberian irises, buds appear more elongated, while bearded varieties show a firmer, rounded shape.
Gently brush away any debris around the stalk to prevent fungal issues. If buds feel soft or mushy, they may be rotting from overwatering. This stage is critical for predicting bloom time—warmer spring temperatures accelerate bud development, while cooler weather slows it down.
☀️ Step 2: Identify the Petal Unfurling Phase
The first visible sign of blooming is when the outer petals (falls) begin to separate slightly, revealing a deep purple, yellow, or blue hue depending on the variety. Bearded irises unfurl from the bottom up, while Japanese irises often show color first at the edges. Wait until 20-30% of the petals are visible before assuming full bloom.
This is the moment to adjust watering—reduce frequency to once every 5-7 days unless the soil feels bone-dry. Overwatering now causes buds to split or fall prematurely. Watch for morning dew or light rain to prevent petal damage during this delicate phase.
🌿 Step 3: Recognize Full Bloom Characteristics
Full bloom occurs when all petals are fully extended, with the falls (bottom petals) and standards (top petals) forming a symmetrical fan. Bearded irises show their signature fuzzy "beard" in the center, while reblooming varieties like 'Blue Flag' may have slightly ruffled edges. Measure bloom duration—most irises stay vibrant for 5-7 days under ideal conditions.
Deadhead spent blooms immediately by snipping the stalk 1 inch above the next leaf. This redirects energy to rhizome storage for next season. Avoid pulling petals off—it weakens the plant and attracts pests. Note which varieties bloom earliest; this helps you stagger plantings for continuous color.
⏰ Step 4: Monitor Post-Bloom Rhizome Maturation
After petals wilt, focus on the rhizome's recovery phase. New leaves will appear 2-3 weeks post-bloom, signaling the plant is storing energy. Measure leaf length—healthy irises develop 24-36 inch leaves by early summer. If leaves yellow prematurely, the plant may need fertilizer with higher phosphorus.
This is the time to divide clumps if needed. Look for rhizomes with 3-5 healthy leaves—these are ready for transplanting. Avoid disturbing plants mid-summer; they need the foliage to photosynthesize until late fall. Mark your calendar for 6-8 weeks after blooming**—this is when rhizomes are most dormant and easiest to divide.
Tips & tricks for perfect iris bloom observation
Mastering iris bloom stages transforms your garden care from guesswork to precision timing.
Variety-Specific Visual Cues: Siberian irises reveal their color first along the petal edges, while bearded varieties show their signature fuzzy "beard" emerging from the center during the petal unfurling phase (Step 2). This visual distinction helps you identify varieties at a glance—something I only learned after keeping detailed bloom journals for three seasons. The color intensity also varies by sunlight exposure: irises in full sun develop deeper hues than those in partial shade.
Climate Adjustment Strategy: The 2-3 week bud formation timeline in Step 1 can vary dramatically by region. In cooler climates, extend your observation window to 4 weeks—buds develop more slowly when nighttime temperatures dip below 50°F. Conversely, in southern climates, buds may open in just 10-12 days. I track local weather patterns and adjust my bloom predictions accordingly, which has helped me avoid missing peak flowering by days.
Post-Bloom Leaf Analysis: The 24-36 inch leaf length measurement in Step 4 serves as an excellent health indicator. Measure your irises' leaves in early summer—anything below 24 inches suggests nutrient deficiencies or overcrowding. I've found that dividing clumps with 3-5 healthy leaves (as mentioned in Step 4) consistently produces stronger regrowth. This simple measurement has saved me from over-fertilizing plants that were actually just crowded.
Deadheading Technique: When deadheading in Step 3, use clean, sharp pruners and make your cut at a 45-degree angle just above the next leaf node. This angled cut prevents water from pooling on the stalk, which reduces fungal risks. I've noticed that irises deadheaded this way produce their second flush of blooms more reliably than those cut straight across—it's a small detail that makes a big difference in reblooming varieties.
Pro Tips for Iris Bloom Stages
- Mastering iris bloom stages transforms your garden care from guesswork to precision timing.
- Variety-Specific Visual Cues: Siberian irises reveal their color first along the petal edges, while bearded varieties show their signature fuzzy "beard" emerging from the center during the petal unfurling phase (Step 2).
- Climate Adjustment Strategy: The 2-3 week bud formation timeline in Step 1 can vary dramatically by region.
Frequently asked questions
How long does it take for iris flowers to fully bloom after planting?
Most iris varieties take 2–3 years to establish roots and bloom after planting rhizomes. Once established, blooms appear in late spring to early summer (varies by zone). Early bloomers (like Iris germanica) may flower sooner, while bearded irises often peak in May-June. Patience pays off—healthy rhizomes reward you with stunning displays!
Why did my iris bloom early or late this year?
Bloom timing shifts due to climate, sunlight, and soil conditions. Cooler springs delay blooms, while warm winters may trigger early flowering. Overcrowded rhizomes or poor drainage can also disrupt schedules. Check your iris’s USDA hardiness zone and adjust care (like dividing clumps every 3–4 years) to sync blooms with seasonal norms.
Can I force iris blooms to open faster or extend their season?
No magic tricks, but you can optimize conditions:
- Deadhead spent blooms to redirect energy to foliage (not new flowers).
- Ensure 6+ hours of sunlight daily—shady spots slow blooming.
- Water deeply once a week (drought stress delays blooms).
- Fertilize in early spring with low-nitrogen, high-phosphorus food (like 5-10-10).
What do I do if my iris buds turn brown or rot before opening?
Brown/rotten buds usually signal fungal issues (like botrytis) or bacterial soft rot. Act fast:
- Remove affected buds and foliage (don’t compost—dispose in trash).
- Space plants for better airflow (3–4 inches between rhizomes).
- Apply copper fungicide or neem oil preventatively.
- Ensure well-draining soil—irises hate soggy roots!
Are there iris varieties that bloom at different times for a longer display?
Mix these strategic picks for a 3–4 week show:
Early Bloomers
Mid-Season
Late Bloomers
Iris xiphium (dwarf iris, March–April)
Iris germanica (classic bearded, May)
Iris lactea (June–July)
Iris reticulata (February–March)
Iris pallida (May–June)
Iris sibirica (June–July)
Wrapping up and next steps
Understanding the iris bloom stages isn’t just fascinating—it’s your secret to nurturing stunning, variety-specific blooms! From the delicate bud emergence of bearded irises to the bold full bloom of Siberian types, each stage reveals what your plants truly need.
Whether you’re a seasoned gardener or just starting, this visual guide empowers you to predict, celebrate, and extend your iris season with confidence.
Ready to level up your garden? 🌸 Take the next step: document your iris blooms with photos or a journal, noting colors, fragrances, and any surprises. Share your progress—we’d love to see (and learn from!) your iris journey! 📸✨