
Propagation
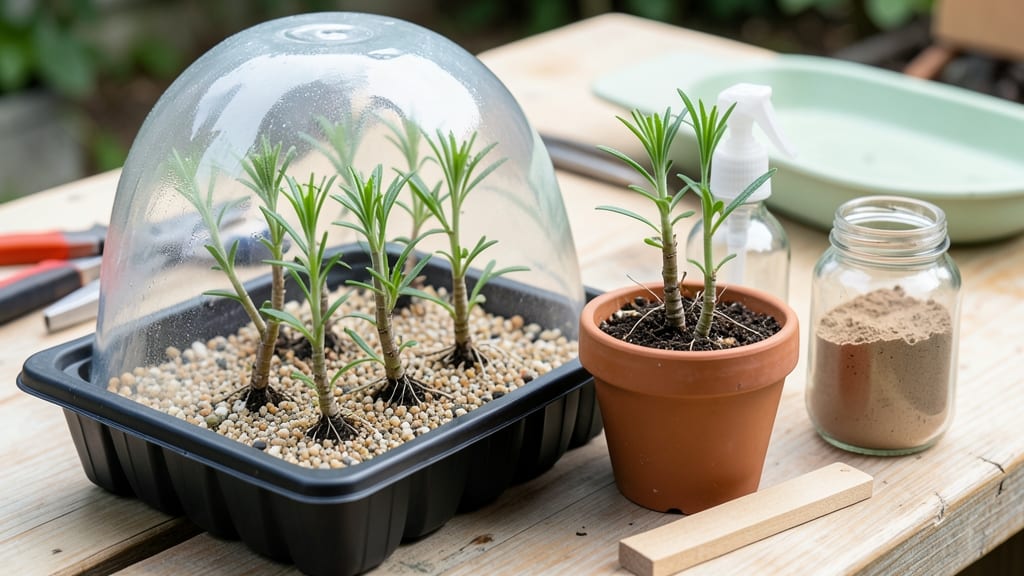
Your Black and Bloom Salvias propagation could be thriving in new pots by next month—no waiting for next spring. 🌱 These striking plants with their deep purple foliage and vibrant blooms multiply easily, but timing and technique make all the difference.
I’ve propagated mine twice now, and the secret lies in clean cuts, the right soil mix, and patience (though the results are worth it). The process starts with sharp pruners, a well-draining mix, and a humid environment—think clear plastic bags or a propagation station.
You’ll need to take 4-6 inch cuttings in early summer when the plant is actively growing, then watch as roots form in just 4 weeks. The dark leaves make them stand out, but they’re just as easy to grow as any other salvia.
By week 6, you’ll see new shoots pushing through the soil, and those signature blooms won’t be far behind. The plants stay compact, making them perfect for containers or borders, and they’ll reward you with months of color if you give them the right start.
This method works for both stem cuttings and division, so whether you’re expanding your collection or sharing plants with friends, you’ll have plenty to go around. Let’s get those roots growing!
📚 In This Guide
- What you need
- Instructions
- Tips and common mistakes
- Wrapping up and next steps
What you need
- ● Salvia cuttings: 4–6 healthy, non-flowering stems (4–6 inches long), taken from the current season’s growth.
- ● Rooting hormone: A powder or gel (like Clonex or Rootone) to boost root development.
- ● Well-draining potting mix: A blend of perlite, vermiculite, and peat moss (or a cactus/succulent mix for faster drainage).
- ● Small pots or trays: 3–4 inch pots (or a seed tray with drainage holes) for each cutting.
- ○ Clear plastic bags or domes: To create a humidity tent (optional but highly recommended).
- ● Spray bottle: For misting cuttings to maintain moisture.
- ● Scissors or pruners: Sterilized and sharp for clean cuts.
- ● Heat mat: Set to 70–75°F to speed up rooting.
- ● Grow lights: If propagating indoors with limited natural light.
- ● Fertilizer (diluted): A weak dose of fish emulsion or seaweed extract after 2–3 weeks.
- ● Labels & markers: To track propagation dates and varieties.
Step-by-step instructions for propagating Black and Bloom salvias
Ready to multiply your salvias fast? This method delivers strong, rooted cuttings in just four weeks.
🌱 Step 1: Take Healthy Cuttings at the Right Time
Select mature stems from established plants in early spring or after flowering. Look for 4-6 inch sections with 3-4 leaf nodes—these are the growth points where roots will form. Use clean, sharp pruning shears to make a clean cut just below a node at a 45-degree angle. This angled cut increases surface area for better water absorption.
Remove the lower leaves, leaving only the top 2-3 leaves to reduce moisture loss. I like to dip the cut end in rooting hormone powder (optional but helpful) to encourage faster root development. This step is critical—weak or diseased stems won't root properly, so choose only vigorous growth.
💧 Step 2: Prepare the Rooting Medium
Fill a small propagation tray or individual pots with a sterile, well-draining mix—I use a blend of 50% perlite and 50% peat moss. Moisten the mix until it feels like a damp sponge, not soggy. Overwatering now will rot your cuttings before roots even form. Tap the tray gently to settle the mix, then create small holes with your finger or a pencil—just deep enough to insert the cuttings.
Keep the tray in a warm spot (70-75°F) with bright, indirect light. A clear plastic dome or plastic bag creates a humidity tent, which speeds up rooting. Check moisture daily—mist lightly if the surface feels dry to the touch. You'll see condensation on the inside of the dome within a few days—that's your sign the humidity level is perfect.
☀️ Step 3: Insert and Monitor Cuttings
Gently insert each cutting into its hole until the node is buried about 1 inch deep. Space them 2 inches apart to allow airflow. Firm the mix lightly around the stems to eliminate air pockets. Place the tray back under the humidity dome and position it where it gets bright, indirect light—no direct sun yet. Too much heat or light at this stage will stress the cuttings before roots develop.
After 2-3 weeks, check for root growth by gently tugging on a cutting. If it resists slightly, roots are forming. If it pulls out easily, give it another week. I've found that salvias often root faster in cooler conditions (65-70°F), so don't rush to move them to warmer spots. Patience here ensures stronger roots.
🪴 Step 4: Transition to Soil and New Pots
Once you see new growth at the top (4-6 weeks total), it's time to transplant. Remove the humidity dome gradually over 3-5 days to acclimate the cuttings to normal air. Fill 4-inch pots with well-draining potting mix and plant each cutting at the same depth it was in the propagation tray. Water thoroughly but avoid soggy soil—salvias hate wet feet.
Place the new pots in partial shade for a week to help them adjust. After that, move them to a spot with full sun (6+ hours daily). You'll know they're thriving when you see fresh, vibrant leaves and steady growth. This is when you can start treating them like mature plants—just give them time to establish roots fully.
Tips & tricks for perfect Black and Bloom salvias propagation
These simple tricks will help you avoid common pitfalls and get stronger roots every time.
Timing Tip: Early spring or right after flowering is the absolute best time for cuttings—this is when your salvias are putting energy into new growth. I've found that cuttings taken in summer often struggle because the plants are focused on flowering rather than root development. If you must propagate in summer, choose early morning when temperatures are cooler.
Cutting Technique: That 45-degree angle isn't just for show—it creates more surface area for water uptake and root formation. Use clean pruning shears to avoid crushing the stem, and always make your cut just below a node. I've ruined more cuttings than I care to admit by cutting above the node, which leaves nothing for roots to grow from. Also, leaving just 2-3 leaves on top prevents too much moisture loss while still allowing enough photosynthesis for energy.
Medium Mix: The 50-50 perlite to peat moss blend is perfect because it drains well while retaining just enough moisture. If you don't have peat moss, you can substitute with coconut coir or even vermiculite. The key is keeping it sterile—sterilize your tray and tools with a 10% bleach solution (rinse well) to prevent fungal issues that can kill your cuttings before roots form.
Humidity Hack: That plastic dome or bag creates a mini greenhouse effect that speeds up rooting. I've seen cuttings root in half the time when using this method. Check for condensation on the inside—this tells you the humidity level is perfect. If you don't have a dome, a clear plastic bag with holes poked for airflow works just as well. Just remember to remove it gradually over 3-5 days before transplanting.
Pro Tips for Black And Bloom Salvias Propagation
- These simple tricks will help you avoid common pitfalls and get stronger roots every time.
- Timing Tip: Early spring or right after flowering is the absolute best time for cuttings—this is when your salvias are putting energy into new growth.
- Cutting Technique: That 45-degree angle isn't just for show—it creates more surface area for water uptake and root formation.
Frequently asked questions
Got questions about propagating Black and Bloom salvias? You’re not alone! Here are some of the most common queries—and their straightforward answers—to help you grow these stunning perennials with confidence.
When is the best time to take cuttings from Black and Bloom salvias?
The ideal window is late spring to early summer (May–June in most climates), when plants are actively growing but haven’t yet flowered. Avoid cutting after the first frost or during extreme heat—both stress the plant and reduce rooting success. Pro tip: Morning cuttings (when moisture is still high) often root faster!
How do I know if my cutting is healthy enough to propagate?
Look for non-flowering stems that are 4–6 inches long with at least 2–3 sets of leaves. Healthy cuttings should feel firm (not woody or mushy) and have no signs of pests or disease. Trim just below a leaf node—this is where roots will sprout! A quick dip in rooting hormone can boost success by 30–50%.
Why aren’t my Black and Bloom cuttings rooting? Troubleshooting tips!
If your cuttings refuse to root, check these common issues:
- Too dry: Keep humidity high (use a plastic bag or propagator) and mist lightly daily.
- Not enough light: Bright, indirect light (like a north-facing window) speeds rooting.
- Overwatering: Soggy soil causes rot—stick your finger in the mix; it should stay moist but not drenched.
- Old or weak stems: Try fresh cuttings from younger, vigorous growth.
Still struggling? Try a water propagation test—place the cutting in a jar of water and watch for roots in 1–2 weeks!
Can I propagate Black and Bloom salvias from seed instead of cuttings?
Yes, but it’s much slower (6–12 months vs. 4 weeks for cuttings). Seeds require stratification (cold treatment) and a warm, humid environment to germinate. For faster, true-to-plant results, stick with cuttings—but seeds are great for experimenting with new varieties!
How do I transition rooted cuttings to outdoor planting?
Once roots are 1–2 inches long (test by gently tugging), harden off your cuttings over 7–10 days:
- Move them outside for 2–3 hours daily, gradually increasing time.
- Choose a partially shaded spot to avoid transplant shock.
- Plant in well-draining soil (mix in perlite or sand) and water deeply but infrequently.
Wait until after the last frost and soil temps are above 55°F for best survival.
Wrapping up and next steps
Growing Black and Bloom Salvias from cuttings is a rewarding journey that yields stunning, drought-tolerant blooms in just four weeks! 🌱 With the right tools—like rooting hormone, a humidity dome, and patience—you’ll soon enjoy vibrant, pollinator-friendly plants.
Whether you’re a seasoned gardener or a curious beginner, this method makes propagation simple and satisfying.
Ready to expand your garden? Start with a few cuttings today, and soon you’ll have a thriving collection of these striking salvias to share or showcase. Happy growing! 🌸